Grzegorz Makarewicz "gsmok"
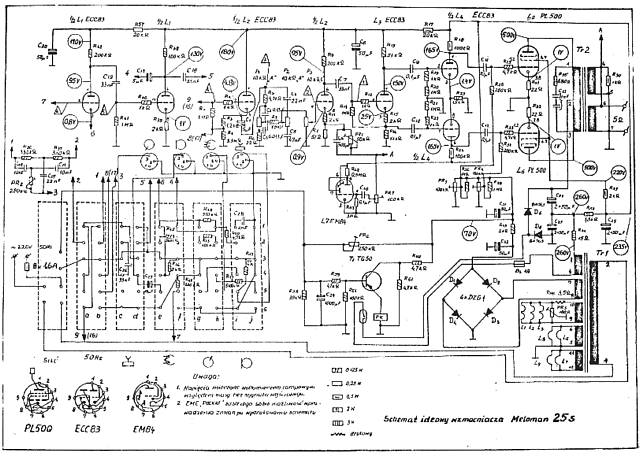
Note: 12.02.2012r. added the original diagram of the amplifier
Tube amplifier produced by POLKAT Wroclaw. The design quite controversial when it comes to opinions of holders. Unfortunately, you have to say "let the veil of silence falls on the quality of its assembling". I think, that pictures presented below speak for themselves. I do not mean, of course the damages associated with the normal operation and storage of the amplifier, but the details of construction and the way they are performed by a "qualified" person with blacksmith skills. I think, the best summary of the amplifier can be opinion of Romek (Romekd) presented on TRIODA community:
"Implementation of this amplifier is a complete crap. Photos that have been posted in the Gallery does not provide the full splendor of the primitivism and mediocrity of it's mechanical structure. You simply have to see it with your own eyes, being careful not to hurt yourself during dismantling this technical "miracle". If today, a high school student of electronics want to give any kind of work and it would be done in mechanical terms like this amp, it would not be highly rated. I think that the spiral electric heater is a true masterpiece of grace and elegance when compared to this amp. In addition, electrical design prevents any upgrades and improvements, and the amplifier is characterized by a significant level of hum and noise.
But there is something surprising and magical in this design! First, that after 33 years since the production of this amp it still works, and the measurement of electrolytic capacitors shows their full capacity and overall efficiency (at least in the copy I own). The second is the fact that the properties of the sound of this amp especially when it comes to music reproduction in the low and mid tones (treble tones do not sound quite as good) are pretty decent, not to say that they are very good!
According to several people who listen to this amp, it sounds much better than the modern, recently manufactured home cinema receiver Sony "STR-DB930," which seems almost unbelievable.
It seems even more surprising, given the fact that the design principles of this amplifier are not correct, for example:
- output transformer windings are not divided into sections - hence soprano leaves much to be desired, despite the fact that the core cross section of 17.4 cm2. seems to be large enough for a 25W output power,
- working of the output tubes in pentode mode and applying the typical TV tubes PL500, which will definitely have an impact on the level of harmonic distortion,
- using PCB paths, not a twisted wires to provide filament voltages and thus perhaps 50Hz hum.
Going back to the look of this amp, I think that its appearance had an impact that the amplifiers in those days were not as popular as radio or television sets, which in some cases were a great interior decoration.
However, this amp, despite its primitiveness, inclined me to return to my interests in old devices and tube amps."
So, welcome to the photo gallery. Let's start with a few photographs covering the entire amplifier.
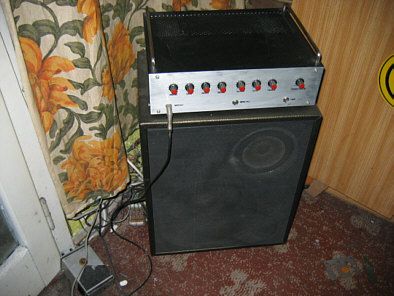
Front view (Fig. 1). The front panel and a wooden enclosure with ventilation holes in the form of narrow slots.
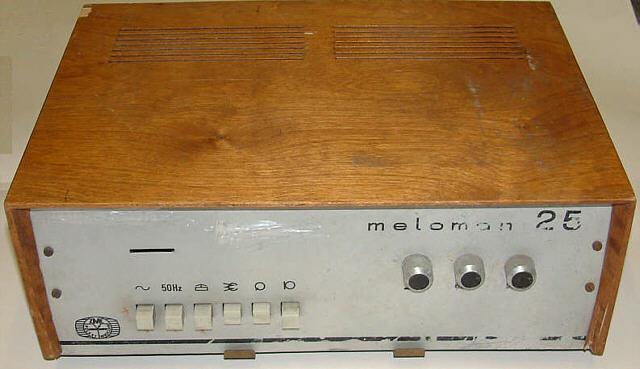
Fig. 1.
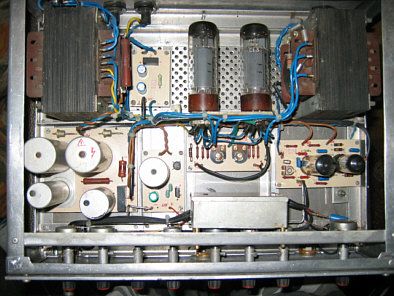
Take off the cover (this requires special "rubber", screwdrivers, help of two friends and a bit of sedatives), and here the amplifier interior presents in all its glory (Fig. 2). I must admit that it looks really impressive. Ordered structure. Input preamplifier section protected with the metal grille. Different copies of "MELOMAN" varied in construction details. I would like to quote here Romek's opinion again:
"My copy of the amp is very different from that shown in the Gallery. The first difference is the outputr transformer. It it is greater than the power transformer and located in the same position (not rotated by 90 degrees). The type of transformer is: TGp25-36-666. The other visible change is electrolytic capacitors plate that contains four diodes bypassed with 220kOhm resistors. The plate is located on the right side of the output transformer (looking from the front)."
These are indeed important differences. Maybe this "artistic" approach to the construction was due to the completely random mounting angles of details. Take a look at the plate with a power supply capacitors. Along 10cm at length we have 1cm deviation from the plane of the frame bracket. Seems that even without any ruler this plate can be fitted better.
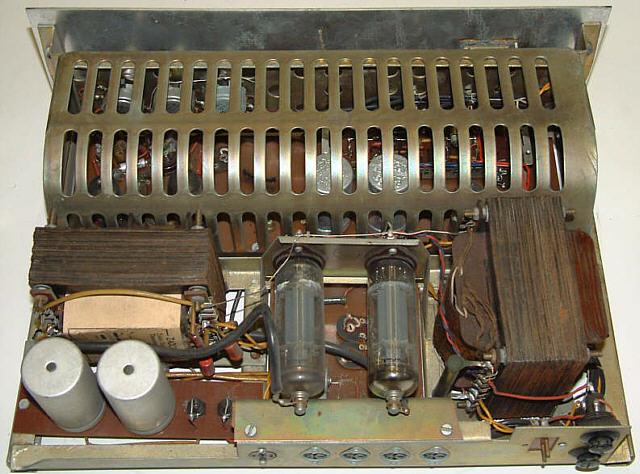
Fig. 2.
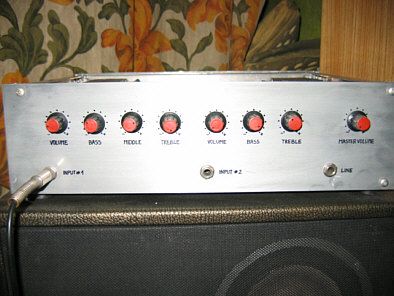
Another shots (Fig. 3. and Fig. 4). Despite visible bungling, it is impossible to pass by the construction. Please imagine that everything is straight and tidy and real view is fabulous. By the way, for the more inquisitive observers - this yellow piece of paper on the front panel is the price I had to pay for this amplifier.
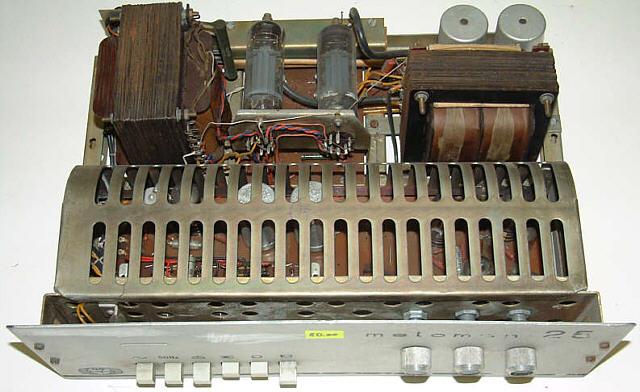
Fig. 3.
After removing the cover all the other details appear (Fig. 4.). I leave for your own the assessment of the installation.
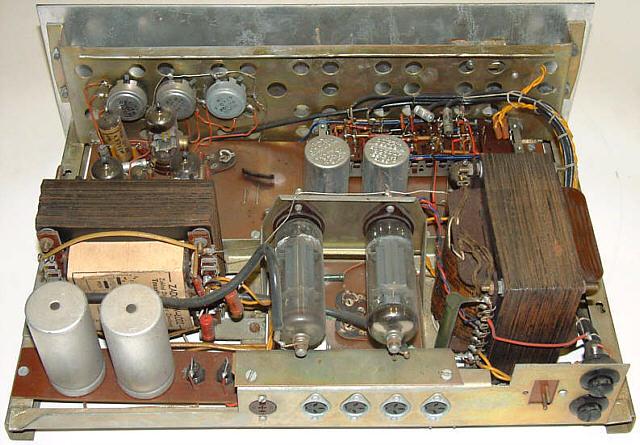
Fig. 4.
And here is the view from the bottom (Fig. 5). Here amplifier looks pretty good.
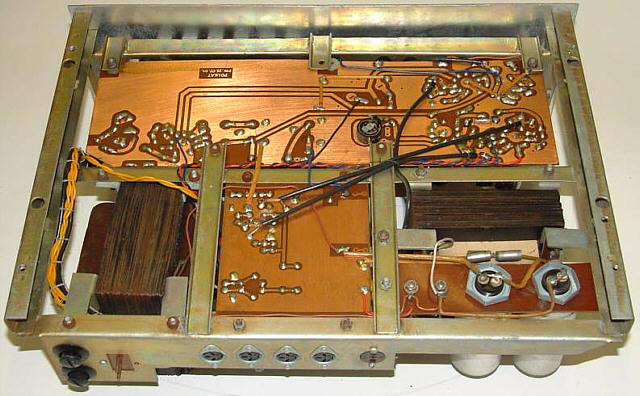
Fig. 5.
And now a few more detailed view of selected sections of the amplifier. At the beginning the tone and gain control section (Fig. 6).
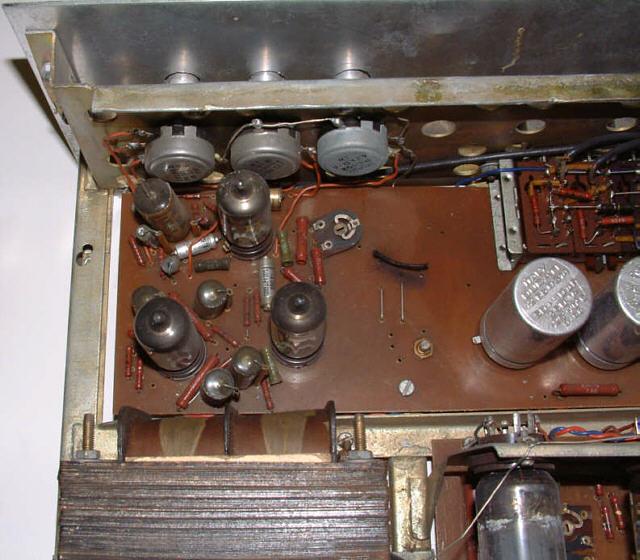
Fig. 6.
And here is the power switch and input selector in all it's glory (Fig. 7). At the top of the right side you can see "tasteful" indentation for the power on indicator. I'm ashamed to admit it, but the first time I saw this I thought that the manufacturer placed here the magic eye to indicate the output voltage level. Unfortunately, I was severely disappointed.
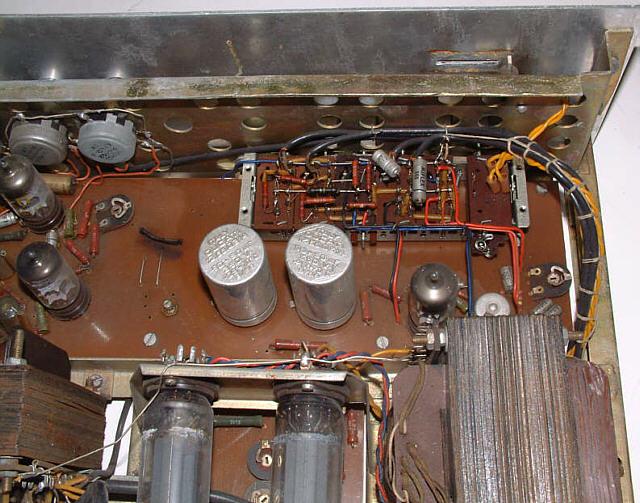
Fig. 7.
Now turn to the artistically mounted plate with capacitors (Fig. 8).
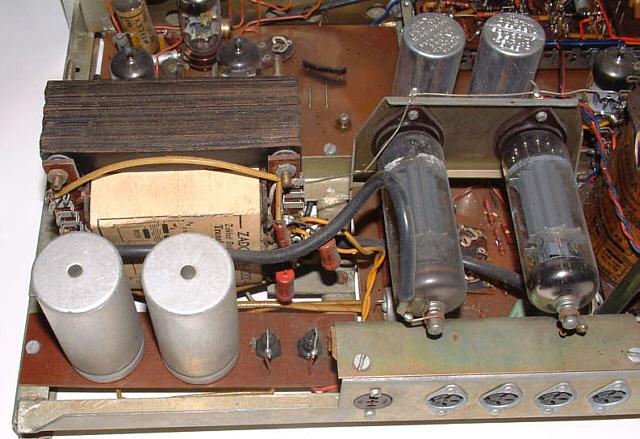
Fig. 8.
Power transformer and the input socket mounted in close proximity to transformers - buzzzzzzzzzzzz (Fig. 9.).

Fig. 9.
Details of the interior shown from a different angle (Fig. 10). Here you can see the bulb, which imitates the magic eye (I can not forgive myself that this is an ordinary light bulb)

Fig. 10.
And a few more shots with the details (Fig. 11 and Fig. 12). These reamed holes in the frame is the effect of failed attempts to hit the frame with drill at right angle.

Fig. 11.
Bottom view of part of the supporting structure (Fig. 12). Here, even more tasteful holes. This time the assembling technician did not bother to hit the drill in a certain point, but he took a drill with a diameter of a table leg and made holes "from left to right".

Fig. 12.
There was the view from the front - time for some photos taken from other sides (Fig. 13 and Fig. 14). Looking at the bottom you can see the lack of one screw. Despite many attempts, I was not able to fix all four. I have tried in various ways, but I always saw only three screw heads through the holes in the cover! I really do not know how the screws were tightened before dismantling the amplifier. The very mysterious phenomenon.

Fig. 13.

Fig. 14.
This is how the inventory number has been removed from the amplifier (Fig. 15). Dear individual who did this, I hope you did it with your own teeth.

Fig. 15.
Trademark stamp the inevitable passage of time (Fig. 16).

Fig. 16.
Do you want to see the details of carpentry work? You're welcome. Parts of the wooden cover were assembled probably by a good friend of the aforementioned blacksmith assistant. As you can see, after building the case, to fit the amp he had some fun in the planing detais with butcher's knife (Fig.17 and Fig.18).
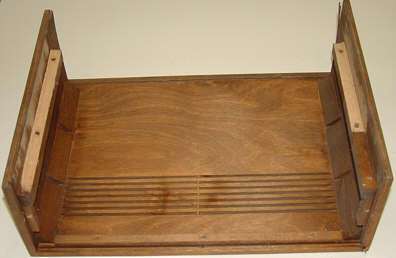
Fig. 17.
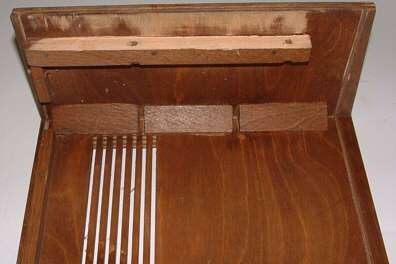
Fig. 18.
Thats all folks. After recovery associated with the two days that I needed to mount the amplifier I will try as far as possible to supplement the description for more details.
I would be grateful for any suggestions and comments related to the "MELOMAN" amplifier.
Romek - Thank you for your help.
Photos: Leszek "Morzo" Morzyński.
MELOMAN According to Alek Zawada
A copy of the "Meloman 25" I bought was incomplete - that is missing the top cover and one PL500 tube. It was quite dirty, so I had to wipe some of the details of acetone. After welding power cord and insert the missing tube I made an attempt to run it.
As a source I used dynamic microphone. An attempt was successful, but after a few minutes I noticed a disturbing symptom of work: one of the output tubes warmed up to the red color and the amplifier began working with ugly distortion. At first I thought that the problem was caused by tube malfunction. However, since I do not have too many PL500 tubes I decided to replace them with PL504 tubes, which I have a lot (a whole box). Tube catalog revealed correctness of such a conversion. In addition, the first attempt to run the amplifier caused the burning of control bulb indicator.
Trying to operqate the amplifier with PL504 tubes soon ended, however, with the same symptoms as before - flushing the output tube anode. So I drew attention to the grid bias voltage adjustment potentiometer. Indeed, after the potentiometer adjustment unfavorable phenomenon of anode redness was completely eliminated, and amplifier began working without distortion, but with a nasty hum. I skipped out this problem temporarily and decided to try to give a signal to the other input of the amplifier. I hoped that input with lower sensitivity did not create as strong a hum. These calculations, however, have failed. After connecting the signal from the computer to the "radio" input another problem was revealed : weak bass and problem with treble adjustment. As for the second fault, it relies on the fact that the adjustment has not been smooth. This clearly indicated on the potentiometer as the drawback of this situation. Indeed, after replacing it treble control has become fluid.
However, the problem with the bass remained. It forced me to look closer to the electric system to the amplifier. So I found the tone control and I started a little experiment with the values of the elements. Change of the 330nF capacitor (see diagram below) to 1000nF and 1.5k resistor to 1k proved to be very beneficial. Inspection revealed the existence of a potentiometer to reduce hum. Adjusting the potentiometer has brought significant improvements at work on the mic input, but the hum still disturbed the perception of sound, especially when applying larger volume levels. I decided not to think about this longer proceeded to draw a diagram of the amplifier.
I think it will enjoy a few idlers who are looking for a long time a diagram of "MELOMAN". I worked hard and drew a schematic from scratch. It is therefore possible that in the diagram there are unwitting errors.
I will discuss the diagram shortly, as you can analyze it by yourself. You can select the input source using input selector in the form of "Isostat" switch. The serious design error is that applied "Isostat" swich is independent. When using inputs with high sensitivity signal is amplified by V1 tube. It has proven advantageous to shield this tube and connect the screen to ground. This is due to the fact that V1 is very close to the transformer. I was intrigued by the possibility of suppressing hum coming from the signal source. For this is a double-T filter for frequency 50Hz is used. A 250k potentiometer is used for the tuning of the filter.
The signal from the switch is applied to the cathode follower V2. Thus relatively low resistance potentiometers for tone and volume control (10k and 4.7 k) could be used. After passing through the equalizer signal is reinforced in the second section of the V2 triode. To the cathode of this triode NFB signal is routed (negative feedback from the output transformer). The 50k trimming potentiometer allows you to adjust the depth of negative feedback. The next stage - the first "half" of V3 tube - is the phase inverter. The second half of this tube is not used. V4 is a tube used as a voltage amplifier controlling output tubes.
Push-pull stage of a power amplifier with tubes V5 and V6 works in the traditional configuration. It should be noted that according to the label the output transformer is probably multisectional. A 100k potentiometers are used to set the grid bias voltages of V5 and V6 tubes. Voltage for the grid is derived from the transformer and then rectified by Graetz bridge with DZG1 diodes. High voltage to the tubes is derived from the rectifier DK 61 diodes. This voltage is smoothing by RC filter.
Investigation of the diagram revealed unprofessional repai r- one of the coupling capacitors have only 2nF instead of the expected 33nF. I replaced it, just as the rest of the 33nF capacitors to 47nF. It is possible that a small coupling capacitance value was the cause of poor bass. New capacitors allow the bass potentiometer to be set to middle position providing good bass reproduction.
I replaced power supply filter capacitors using:
- instead of 100μF (50 +50) a 330μF,
- instead of 50μF a 220μF and
- replacing the last (in the diagram at the top left) 50μF to 47μF capacitor.
This temporary modification improved performance again.
Another important observation was that the amplifier grounding path was mounted very poorly. While the PCB ground tracks are very wide at the same time the connection between them was made by very thin - probably steel!!! wirel. So I throw these wires and replaced them with copper tape about 0.3 mm thick and 10mm wide. After this, hum has become virtually inaudible and the remainder comes from the output stage of the amplifier (I tested this by removing the tubes from the voltage stages). It is possible that the values of capacitors supplying the outout tubes should be increased. In addition, I decided to equip the amplifier wityh a magic eye based on EM84 tube because II could not stand the "empty" slot in the front panel. After removing the light bulb (heat shrinkable tubing sealed the remaining wires) I connected the magic eye. The control signal is fed from the secondary winding of the output transformerr (I used voltage doubler), anode voltage from the 330μF capacitor, and filament voltage from V4 heater. Amplifier with the magic eye looks much better, but I have yet to think of the cover - operating the amplifier without a housing is impermissible.
In addition, I replaced some of the resistors and capacitors to new, however, this improvements were only preventive and had no an important impact on improving the operation of the amplifier.
I must admit that I am very happy with this amp. Despite it's faults and deficienciesl I like the design. It has just the "something". It is possible that this "something" is used in it the popular television lights.
I encourage all owners of "MELOMAN 25" to try to eliminate of the inherent hum and noise. You will look at this amp at a different angle. Initially, I intended to use it as a "donor" of electric parts, but I changed my mind.
Alek Zawada,
Modified MELOMAN According to Zbyszek "Dziadek"
I quote of the Author of photos:
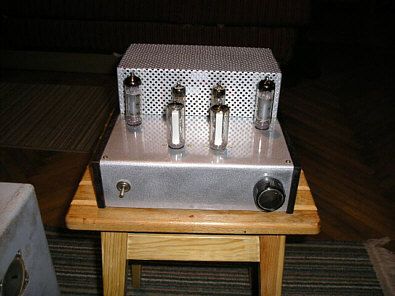
"Three photos of what came out of the original design to improve Melomana25 (I just kicked out everything and made the amplifier from scratch). Now, it is a hybrid device used as guitar amplifier."
Photos can be enlarged by clicking the mouse on the selected image. Images number 19, 20 and 21 relate to the presented hybrid amp. In the photo number 22 you can see one of the Author's construction.
Zbyszek "Dziadek" -
MELOMAN According to Vault Dweller
Yesterday I came into possession of this amp (thanks to Triodes member - brener2). At first I thought that I will have a lot of work with it. At the start I cleaned the interior, where the dust and spiders did their job. Then I turned on the amplifier. And what? Not a single sound, although the tubes glowed. I checked what is usually inspected first in such situations - the anode fuse. Burnt ... Instead of the fuse I connected of 100W light bulb in series with the power. When I turned the amp again the bulb flashed on and off very briefly - apparently the "fast" fuse had to be inserted, and it was obvious that it had to burn out.
I turned on the amplifier with a aforementioned light bulb and speaker. Result: terrible hum. I replaced rectifier diodes (there were four BA564 connected in series and bypassed with 200K resistor each) with the 1N4007 diodes, but still nothing. Then I fixed one error on the board - the center tap of the filament of one tube was grounded - and should have been "hanging in the air" as it was a balancing potentiometer. I replaced the ground of all connections, welded the heater voltage symmetrization potentiometer to ground - and I managed to a large extent elimination of the hum.
Time for listening tests. First, the amplification factor was far too big (I checked it using "Radio" input), so I did a little adjustment of feedback potentiometer. The sound has been greatly improved. Currently amplifier is used to play "Metallica". As for the future I plan to use it as an instrumentation/ guita amplifier.
A few minor alterations in the style of a master volume replacement (I have 10K C), set up a mic input jack (for connecting a guitar) on the front panel - (since there is an ugly hole under the volume control and I would like to use it somehow).
After two days, I came to the conclusion that the tone control is still incorrect ... I decided to replace the resistor 4K7 to 3K3. Bass was deeper, you could get more of his raise. I also replaced the rest of the original ground connection wires to 1.5 mm2 silver-plated cable, and I fought all problems with hum, even for max amplification and with an open microphone input. As for the latter, I mounted big jack socket on the front panel to be able to connect a microphone or guitar. The sound of the modified amplifier is in my opinion much better than before.
4.09 - I introduced further improvements to the amplifier. Like Alek Zawada, I mounted a EM84 magic eye. Voltage taken from the secondary winding of output transformer was not enough "in itself" after rectification for full control of the magic eye, so I made an additional stage utilizing of the unused half of the ECC83 tube (the one where the other half is used as a phase inverter).
Vault Dweller:
Added: 12.02.2012r. by gsmok
Thanks to TRIODA's user pionier62, who posted the factory diagram of "MELOMAN 25" I could further support this description of this important element. Diagram can be opened in a new browser window by clicking on it with your mouse.
Grzegorz Makarewicz "gsmok"

